 How do I use Word mail merge?
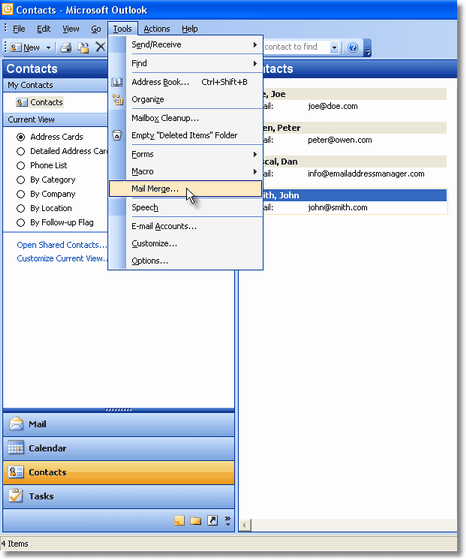
First of all, from Outlook open the Contacts List view. Depending on your Outlook view settings, you can display the Contacts List either by clicking on the Contacts bar (if visible) or by browsing to the Contacts folder through the mail folders browsing panel.
If you wish to send the email only to some of the contacts, then select them one by one or filter then using the Customize Current View of the Outlook View menu. Then, once the Contacts List is shown, go to "Tools->Mail Merge...".

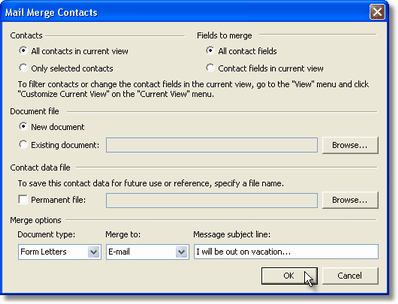
On the Mail Merge Contacts window, depending on your previous contacts selection, choose to send the email to all your contacts or only to the filtered/selected ones. If you wish to use an existing MS-Word template for the new mail merge session, select the "Existing Document" radio button and browse to that Word file. To save your current selection, check the "permanent file" option and enter a name for it. From the Merge Options frame, select to Merge to E-mail and enter a subject for your message. Then hit "Ok" to proceed to the next step.

MS-Word will open the new email message, showing the Mail Merge toolbar. If the toolbar doesn't show, then right click on the MS-Word's file menu and select the "Mail Merge" view. To enter the greeting text which will be sent to each contact, on the Mail Merge toolbar click on the icon labeled "Insert Greeting Line".

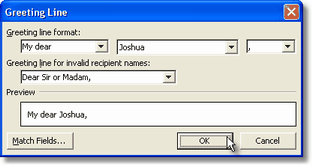
On the Greeting Line window, enter the desired format (how to greet each contact) and click on Ok. You will notice on your document that it will show a tagged line: this line defines the greeting settings for the Outlook Merge feature.

If you didn't use an existing document template, then type the message content, making sure that you don't delete the tagged lines previously inserted. Here is a sample:

When you are done editing the document, click on the "Merge to E-Mail" icon from the Mail Merge toolbar. Then, on the next Merge to Email window, just click Ok, as you already made your selections when you started the mail merge in Outlook.

MS-Word will transmit the email messages to Outlook, which will customize the email for each of the selected contacts. Once this merging job is done, you will notice new outgoing emails stored in your Outbox folder.

To further customize a mail merge session, you may use the other Mail Merge settings of MS-Word. Briefly speaking, each property of your contacts (name, address, phone, business field, etc) can be used within a mail merge in order to customize the outgoing email. |
http://www.emailaddressmanager.com/tips/email.html
 How do I use Word mail merge?


Microsoft Outlook users often connect to a Microsoft Exchange server, which is the Windows email server software. Exchange Server software sends email to an Outlook client, and contacts are stored on the Exchange server. To export a list of contacts to Excel, you can use the Outlook export utility. Thanks.
ReplyDelete