Solution 1: Click Here Download Clean Wipe
Solution 2: Click Here Remove Manually
Friday, June 26, 2009
Removing Startup Items located in the registry
Should you decide to prevent specific items from starting up you can uncheck them in the System Configuration Utility. Though this method is fine it is ultimately best to remove them from the source. To access the common registry locations of these items take a look in the following areas:
HKEY_LOCAL_MACHINE\SOFTWARE\Microsoft\Windows\CurrentVersion\Run
HKEY_LOCAL_MACHINE\SOFTWARE\Microsoft\Windows\CurrentVersion\RunOnce
HKEY_CURRENT_USER\Software\Microsoft\Windows\CurrentVersion\Run
HKEY_CURRENT_USER\Software\Microsoft\Windows\CurrentVersion\RunOnce
If you have disabled items in the System Configuration Utility and would like to remove them from the registry also they can be found in one of the following locations:
HKEY_LOCAL_MACHINE\SOFTWARE\Microsoft\SharedTools\MSConfig\startupfolder
HKEY_LOCAL_MACHINE\SOFTWARE\Microsoft\Shared Tools\MSConfig\startupreg
Sunday, June 21, 2009

Saturday, June 20, 2009
How to extract Netopsystem fead files

http://www.schooltechnician.co.uk/files/utilities/feadextractor.exe/download.html
Sunday, June 14, 2009

Friday, June 5, 2009
Blank Desktop with error message Windows cannot find C:\WINDOWS\explorer.exe
Solution:
Computer boots to blank desktop with error message 'Windows cannot find C:\WINDOWS\explorer.exe'
- Press Ctrl + Alt + delete key
- Click New Task
- Type cmd
- Type cd\windows
- Type ren explorer.exe explorercopy.exe
- Restart Computer
Important This section, method, or task contains steps that tell you how to modify the registry. However, serious problems might occur if you modify the registry incorrectly. Therefore, make sure that you follow these steps carefully. For added protection, back up the registry before you modify it. Then, you can restore the registry if a problem occurs. For more information about how to back up and restore the registry, click the following article number to view the article in the iYogi Knowledge Base: How to back up and restore the registry in Windows
- Click Start -> Run -> Regedit
- Click HKEY_LOCAL_MACHINE\SOFTWARE\Microsoft\Windows NT\CurrentVersion\Image File Execution Options\explorer.exe
- On the right hand side delete the 'debugger' key
BitWare Causes Spoolsv.exe Program Error in Windows
Error: Spoolsv.exe has generated errors and will be closed by Windows. You will need to restart the program. An error log is being created. Printer operation cannot continue due to lack of resources. Cause: This situation can occur if BitWare for Windows is installed. The current versions of BitWare are 3.30 and 7.0, which are not fully compatible with the versions of Windows that are listed in the 'Applies to' section of this article. To check to see if BitWare is running, look for instances of Bwagent.exe or Bwprnmon.exe in Task Manager. Solution: SYMPTOMS You may receive the following error message when you boot your computer, try to use a printer, or start a program that interacts with a printer: Spoolsv.exe has generated errors and will be closed by Windows. You will need to restart the program. An error log is being created. The Spooler service then stops, but can be restarted. While the spooler is stopped, the following error message is generated: Printer operation cannot continue due to lack of resources.
RESOLUTION WARNING : If you use Registry Editor incorrectly, you may cause serious problems that may require you to reinstall your operating system. Use Registry Editor at your own risk.
|
Rundll32.exe entry point not found error message when you open My Computer System Properties
| Cause: These problems may occur if Windows XP SP1a or Windows Update updates the Winsta.dll file and the repair installation does not restore the Winsta.dll file correctly. These problems may also occur if a virus scanning program interferes with the installation of a service pack. Solution: 1. Restart the computer in safe mode:
| ||||||
| 2. Open My Computer, and then open the C:\Windows\INF folder. | ||||||
| 3. Right-click the sr.inf file, and then click Install. | ||||||
| 4. When the installation process has completed, restart the computer. |
If you continue to experience one or more of the problems that the "Symptoms" section describes after you have completed the previous steps, restart the computer in safe mode, and then reinstall Windows XP SP1a or install the latest Windows XP service pack.
To obtain Windows XP SP1a, visit the following Microsoft Web site:
http://www.microsoft.com/windowsxp/downloads/updates/sp1/default.mspx


Error: Cannot find the Rundll32.exe file when you open Control Panel in Windows XP
Cause:
This issue occurs because of a missing or corrupted Rundll32.exe file. This issue may also be caused by a virus.
SUMMARY
This article describes about an error missing or corrupted Rundll32.exe while you open Control Panel in Windows XP
Solution
- Place Windows XP CD ROM disk in the CD ROM drive.
- Click Start, and then click Run.
- Type expand X:\i386undll32.ex_ c:\windows\system32undll32.exe in the Open box, where X is the letter of your CD ROM Drive.
- Restart the computer.
How to: Change the listening port for Remote Desktop
To change the port that Remote Desktop listens on, follow these steps.
Warning: If you use Registry Editor incorrectly, you may cause serious
problems that may require you to reinstall your operating system.
Microsoft cannot guarantee that you can solve problems that result
from using Registry Editor incorrectly. Use Registry Editor at your own risk.
Please backup the registry before making any changes
1. Start Registry Editor.
2. Locate and then click the following registry subkey:
'HKEY_LOCAL_MACHINE\System\CurrentControlSet\Control\
TerminalServer\WinStations\RDP-Tcp\PortNumber '
3. On the 'Edit' menu, click 'Modify', and then click 'Decimal.
4. Type the new port number, and then click 'OK'.
5. Quit Registry Editor.
For additional information, check the following article in the Microsoft Knowledge Base:
'307711 Remote Assistance invitation file does not contain correct port number.'
NOTE: The Remote Desktop Connection Client for the Mac supports only port 3389. 3389 is the default port. When you try to connect to this computer by using the Remote Desktop connection, you must type the new port.
How to Change the Font, Size, and Colors of Desktop Items
MORE INFORMATION
In Windows XP, you can personalize the look and feel of your desktop by changing the font, size, and colors of individual Window elements such as menus, icons, and title bars.
NOTE : You can change the look of individual items if you select Windows Classic style in the Windows and buttons list on the Appearance tab of Display Properties . (Right-click an empty area of your desktop, then click Properties , and then click the Appearance tab). If you select a visual style other than Windows Classic, that style determines the appearance of your menus, fonts, icons, and other Window elements.
How to Change the Color, Size, and Font of Individual Window Elements
To change the font, size, or colors of individual Window elements, follow these steps:
| 1. | Right-click an empty area of your desktop, and then click Properties . | ||||||||||||||||
| 2. | Click the Appearance tab, and then click Advanced . | ||||||||||||||||
| 3. | In the Item list or in the preview window, click the Window element that you want to change. You can select from any of the following items: 3D Objects | ||||||||||||||||
| 4. | Do any of following to achieve the look that you want:
A preview of your current settings is displayed in the preview window. | ||||||||||||||||
| 5. | When you are finished making the changes that you want, click OK twice to save your settings. |
NOTE :
| ? | If you click Window in the Item box, and then modify the font color for that item, the automatic font color that is available in many programs is also modified. Any documents that use the automatic font color are affected if you change this setting. Many programs, including WordPad and Microsoft Word, use automatic as the default font color. Any new documents that you create in these programs use the new font color that you select for the Window item. |
| ? | As you modify items, note their appearance in the preview window. Note that you must use the same font and size for the Active Title Bar and Inactive Title Bar items, and that bold or italic selections for either item are applied to both items. If you choose a desktop theme after you change fonts or colors, the fonts and colors for that desktop theme override your selections. |
Unable to Change desktop wallpaper in Windows Vista
SUMMARY
This article describes how to set desktop wallpaper in Windows Vista
Soultions
- Click Start and Click on Control pannel
- Click Ease of Access Center -> Make the computer easier to see.
- Check turn off all unnecessary animations (When Possible)
- Check remove background images (where Available)
- Click Save and Exit
This should resolve the issue, if not then you need to modify registry settings.
Important This section, method, or task contains steps that tell you how to modify the registry. However, serious problems might occur if you modify the registry incorrectly. Therefore, make sure that you follow these steps carefully. For added protection, back up the registry before you modify it. Then, you can restore the registry if a problem occurs. For more information about how to back up and restore the registry, click the following article number to view the article in the iYogi Knowledge Base:
How to back up and restore the registry in Windows
- Click Start and click Start Search
- Type Regedit and press Enter
- Navigate the following registry path:
HKEY_LOCAL_MACHINE\SOFTWARE\Microsoft\Windows\CurrentVersion\policies
- Right Click on Policies-> Click New> Key>Name it as ActiveDesktop
- On Right hand side Right Click New> DWORD> Name it as NoChangingWallPaper
- Double click on NoChangingWallPaper
- The DWORD value 1 will restrict change in desktop wallpaper. To allow change give it a value as 0
- Restart the Computer
Save password setting not retained in Outlook or Outlook Express
Prompt (come) user name and password window again & again:
Method 1: Create a new Outlook profile or a new Outlook Express identity
The first thing that you should try is to create a new Outlook profile if you are using Outlook or to create a new Outlook Express identity if you are using Outlook Express. To do this, see either the "Create a new Outlook Profile" section or the "Create a new Outlook Express identity" section later in this article.Create a new Outlook Profile
Create a new Outlook profile, and then configure the new profile to use the personal folders (.pst) file that was used by the damaged profile. To do this, follow these steps:- Locate the .pst file
To locate the .pst file that your profile uses, follow these steps for the version of Outlook that you are using.
For Microsoft Office Outlook 2007- Start Outlook.
- On the Tools menu, click Account Settings.
- On the E-mail tab, click your e-mail account.
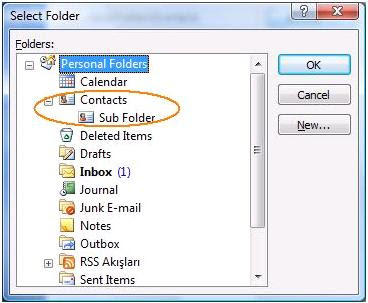
- In the Account settings dialog box, under Selected e-mail account delivers new e-mail messages to the following location, you will see the path and the file name for the .pst file that is associated with your e-mail profile. For example, the path and the file name may resemble the following: C:\Documents and Settings\ user_name \Local Settings\Application Data\Microsoft\Outlook\Personal Folders(1).pst
- Note the path and the file name for the .pst file that is associated with your e-mail profile.
- Start Outlook.
- On the Tools menu, click Options.
- On the Mail Setup tab, click Data Files.
- Note the path and the file name for each .pst file that is associated with your e-mail profile. For example, the path and the file name may resemble the following: C:\Documents and Settings\ user_name \Local Settings\Application Data\Microsoft\Outlook\Personal Folders(1).pst
- Create a new e-mail profile in Outlook
After you locate the .pst files, create a new e-mail profile in Outlook. To do this, follow these steps.
For Outlook 2007- Start Outlook.
- On the Tools menu, click Account Settings.
- Click the E-mail tab, and then click New.
- Follow the instructions in the Add New E-mail Account wizard to create the new account.
Note If you do not have the account information that the Add New E-mail Account wizard requires, view the settings for your existing account. To do this, click the account on the E-mail tab in the Account Settings dialog box, and then click Change. Note each setting in the Internet E-mail Settings dialog box.
If you do not know the password for your e-mail account, contact your Internet service provider (ISP). Or, if your mailbox is not associated with your ISP, contact the network administrator of the server on which your mailbox is located for help with your password.
For more information about how to create a new e-mail profile in Outlook 2003 and in Outlook 2002, click the following article numbers to view the articles in the Microsoft Knowledge Base: - Configure the new profile to use the .pst file that was used by the damaged profile
After you create the new profile in Outlook, configure the new profile to use the .pst file that was used by the damaged profile. To do this, follow the steps for the version of Outlook that you are using.
For Outlook 2007- Start Outlook.
- On the Tools menu, click Account Settings.
- On the E-mail tab, click your e-mail account.
- Click Change Folder under Selected e-mail account delivers new e-mail messages to the following location at the bottom of the Account Settings dialog box.
- Click New Outlook Data File, click Office Outlook Personal Folders File, and then click OK.
- Locate and then click the .pst file that was used by the damaged profile, and then click OK.
- Start Outlook.
- On the Tools menu, click Options.
- On the Mail Setup tab, click E-mail accounts, click View or change existing e-mail accounts, and then click Next.
- Click New Outlook Data File, click Personal Folders file (.pst) under Types of storage, and then click OK.
- Locate and then click the .pst file that you want to use, and then click OK two times.
Note If you want to use more than one .pst file, repeat steps 4 and 5 for each .pst file that you want to use with the new e-mail profile. - In the Deliver new e-mail to the following location list, click Personal Folders, and then click Finish.
- Click OK if you receive the following message:
- On the File menu, click Exit.
- Start Outlook. Then, click Yes to update the Outlook Bar shortcuts to point to the .pst files if you receive the following message: The location that messages are delivered to has changed for this user profile. To complete this operation, you may need to copy the contents of the old Outlook folders to the new Outlook folders. For information about how to complete the change of your mail delivery location, see Microsoft Outlook Help. Some of the shortcuts on the Outlook Bar may no longer work. Do you want Outlook to re-create your shortcuts?
Create a new Outlook Express identity
To create a new Outlook Express identity, follow these steps:- On the File menu in Outlook Express, point to Identities, and then click Add New Identity.
Or, on the File menu, point to Identities, click Manage Identities, and then click New. The New Identity dialog box will open. - Type your name in theType Your name box.
- Click to select the Require Password check box if you want to set a password for this identity, and then click OK.
- Click Yes in the Identity Added dialog box. Outlook Express asks whether you want to log on as a new user.
If you click Yes, you will be prompted for information about your Internet connection. If you click No, the current user remains logged on.
Advanced troubleshooting
The following methods require more advance computer knowledge. If you are not comfortable with advanced troubleshooting, you might want to ask someone for help or contact support. For information about how to contact support, visit the following Microsoft Web site:http://support.microsoft.com/gp/assistsupport (http://support.microsoft.com/gp/assistsupport)
Method 2: Start Outlook in safe mode
To start Outlook in safe mode, follow the steps for the version of Windows that you are using.For Windows Vista
- Click Start, type outlook.exe /safe in the Start Search box, and then press ENTER.
- Click Start, and then click Run.
- In the Open box, type outlook.exe /safe, and then click OK.
http://support.microsoft.com/gp/assistsupport (http://support.microsoft.com/gp/assistsupport)
To troubleshoot possible problems that are caused by COM add-ins, disable any COM add-ins that you do not use regularly. Then, restart Outlook. If that does not resolve the problem, disable the add-ins one by one. If that does not resolve the problem, disable all add-ins. To disable COM add-ins, follow the steps for the version of Outlook that you are using.For Outlook 2007
To disable COM add-ins, follow these steps:
- On the Tools menu in Outlook 2007, click Trust Center.
- Click Add-ins, click COM Add-ins in the Manage list, and then click Go.
- In the COM Add-Ins dialog box, click to clear the check boxes for any COM add-ins that you want to disable.
- After you disable the add-ins, click OK, and then restart Outlook.
To disable COM add-ins, follow these steps:
- In Outlook 2002 or Outlook 2003, click the Tools menu, and then click Options.
- Click the Other tab, and then click Advanced Options.
- Click Add-In Manager.
- In the Add-In Manager dialog box, click to clear the check boxes for any COM add-ins that you want to disable, and then click OK three times.
- Restart Outlook.
322756 (http://support.microsoft.com/kb/322756/ ) How to back up and restore the registry in Windows
The following resolution should not be used unless all other relevant password troubleshooting has been tried.Method 3: Back up your registry and remove the user account information from the "Protected Storage System Provider" subkey. Then, reenter your password options.
To do this, follow the steps for the version of Windows that you are using.Note the the steps listed in this section should not be used on a computer running Windows Vista.
Back up the registry key
- Click Start, and then click Run.
- In the Open box, type regedit, and then click OK.
- Locate and then click the following registry key: HKEY_CURRENT_USER\Software\Microsoft\Protected Storage System Provider
- On the File menu, click Export.
- In the Save in box, select a location where you want to save the .reg file.
- Type a file name in the File name box, and then click Save.
- On the File menu, click Exit.
Remove the user account information
Important Do not remove the main Protected Storage System Provider key. This key is not automatically regenerated. If you do not have password retention problems and you do not remember your password, deleting the user subkey may cause you not to be able to retrieve your mail.Note If you use Windows XP, you must have administrator permissions to edit the system registry.
- Exit all programs.
- Click Start, click Run, type regedit in the Open box , and then click OK
- 3. Locate and then click the following registry key: HKEY_CURRENT_USER\Software\Microsoft\Protected Storage System Provider
- On the Edit menu, click Permissions.
- Click the registry key for the user who is currently logged on. Then, make sure that the Read and Full Control permissions are both set to Allow.
- Click Advanced. Then, verify that the user who is currently logged on is selected, that Full Control is listed in the Permissions column, and that This Key and Subkeys is listed in the Apply to column.
- Click to select the Replace permission entries on all child objects with entries shown here that apply to child objects check box.
- Click Apply, and then click Yes to continue.
- Click Ok two times
- Double-click the Protected Storage System Provider key to expand the key. Click the user subkey folder that is directly underneath the Protected Storage System Provider key, click Delete on the Edit menu, and then click Yes in the warning message dialog box.
The user subkey folder resembles the following example:
S-1-5-21-124525095-708259637-1543119021-16701
Note For every identity that you have, there may be a subkey under the Protected Storage System Provider key. To resolve this issue in all identities, you must delete all the user subkeys folders that are under the Protected Storage System Provider key. - On the Registry menu, click Exit. Then, restart the computer.
For Microsoft Windows 2000
How to back up the registry
- Click Start, and then click Run.
- In the Open box, type regedt32, and then click OK.
- Locate and then click the following registry key:HKEY_CURRENT_USER\Software\Microsoft\Protected Storage System Provider
- On the Registry menu, click Save Key.
- In the Save in box, select a location where you want to save the .reg file.
- Type a file name in the File name box, and then click Save.
- On the Registry menu, click Exit.
How to remove the user account information in the registry
Important Do not remove the main Protected Storage System Provider key. This key is not automatically regenerated. If you do not have password retention problems and you do not remember your password, deleting the user subkey may cause you to be unable to retrieve your mail.
Note If you use Windows 2000, you must have administrator permissions to edit the system registry.
- Exit all programs.
- Click Start, and then click Run.
- In the Open box, type regedt32, and then click OK.
- Locate and then click the following registry key:HKEY_LOCAL_MACHINE\Software\Microsoft\Protected Storage System Provider
- On the Security menu, click Permissions
- Click the registry key for the user who is currently logged on. Then, make sure that the Read and Full Control permissions are both set to Allow.
- Click Advanced. Then, verify that the user who is currently logged on is selected, that Full Control is listed in the Permissions column, and that This Key and Subkeys is listed in the Apply to column.
- Click to select the Reset permissions on all child objects and enable propagation of inheritable permissions check box.
- Click Apply, and then click Yes when you are prompted to continue.
- Click OK two times.
- Double-click the Protected Storage System Provider key to expand the key. Click the user subkey folder that is directly underneath the Protected Storage System Provider key, click Delete on the Edit menu, and then click Yes in the warning message dialog box.
The user subkey folder resembles the following example:
S-1-5-21-124525095-708259637-1543119021-16701
Note For every identity that you have, there may be a subkey under the Protected Storage System Provider key. To resolve this issue in all identities, you must delete all the user subkeys folders that are under the Protected Storage System Provider key. - On the Registry menu, click Exit, and then restart the computer.
How to reenter your password in Outlook 2002 and in Outlook 2003
- Click Start, point to Settings, and then click Control Panel.
Note In Windows XP, click Start, and then click Control Panel. - Double-click the Mail icon or the Mail and Fax icon.
- Click Show Profiles, click the account that you are troubleshooting, and then click Properties.
- Click E-mail Accounts.
- Confirm that the View or change existing e-mail accounts check box is selected, and then click Next.
- In the E-mail Accounts dialog box, click the account that you are troubleshooting, and then click Change.
- Under Logon Information, enter the password, and then click to select the Remember Password check box.
- Click Next, and then click Finish.
- Start Outlook.
- Use the Send and Receive command to determine whether your password is retained.
How to reenter your password in Outlook 2000 Corporate or Workgroup (CW)
- Click Start, point to Settings, and then click Control Panel.
Note In Windows XP, click Start, and then click Control Panel. - Double-click the Mail icon or the Mail and Fax icon.
- Click to select Internet E-mail in the services list, and then click Properties.
- On the Server tab, enter the password, and then click to select the Remember Password check box.
- Click Apply, and then click OK.
- Start Outlook.
- On the Tools menu, click Send and Receive to determine whether your password is retained.
How to reenter your password in Outlook Express
- Start Outlook Express.
Note If you receive a logon error, close the dialog box and continue. - Click Tools, and then click Accounts.
- Click the Mail tab in the Internet Accounts window.
- In the Account column, click to select the Internet e-mail account that you want to change, and then click Properties.
- On the Server tab, type your password in the Password box, and then click to select the Remember password check box.
- Click OK, and then click Close.
- Exit and then restart Outlook Express.
- On the Tools menu, click Send and Receive to determine whether your password is retained.
How to copy or move Outlook contacts into Business Contact Manager
SUMMARY
This article describes how to import Outlook Contacts to Business Contact Manager.
This article imples to Microsoft Outlook 2003 and 2007
Solution
There are two easy ways to move Outlook contacts into Business Contact Manager contacts.
Method 1
The recommended way is to use Import/Export functionality.
- Open Microsoft Outlook
- Click File->Import and Export->Business Contact Manager for Outlook.
- Select Import File option and click Next.
- Select Outlook Contacts Folder from the list of option and click Next.
- Choose the contact folder
- Click Next.
- Your contacts will be copied to Business Contacts. Business Contact Manager also supports importing reminders, follow up flags and Categories.
Method 2
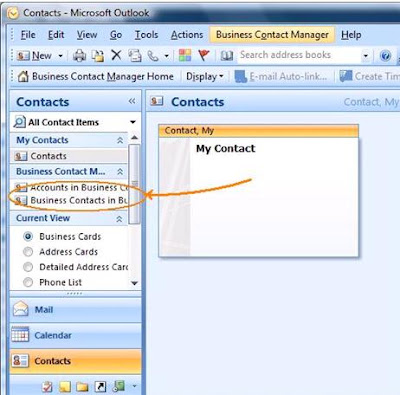
Other way to move Outlook contacts is to drag and drop contacts into BCM contacts or accounts.
- Open Outlook
- Click on Go -> Contacts
- Select contacts you want to move into Business Contact Manager .
- Drag and drop them into Business Contact Manager folder.

Things to remember about Importing
- If you use Import/Export functionality method then your contacts will be copied to Business Contact Manager Business Contacts folder. However if you drag and drop they will be moved. If you still want to keep original Outlook contacts you should press CTRL button during drag and drop.
- Import/Export method copies contacts to Business Contacts folder. If you want to move them into Account folder you should use drag and drop method.
- If your Outlook contacts have attachments, you'll get an error in drag and drop method. BCM does not support attachments in comments field. If you use Import/Export functionality contact will get imported, however the attachment will not.
- Business Contact Manager does not import journal items attached to Outlook contacts. It imports only the contact itself.
Error:Business Contact Manager cannot connect to Small Business Accounting
Cause:
This problem may occur if one of the following conditions is true:
1. Outlook 2003 with Business Contact Manager is linked to a database
that was created in an older version of Small Business Accounting 2006.
2. You are trying to link Outlook 2003 with Business Contact Manager to
a database that was created in an older version of Small Business
Accounting 2006.
Solution:
A later version of Small Business Accounting must be installed and its company database must be upgraded.
To resolve this problem, follow these steps: Upgrade needed for selected company. The selected company belongs 3. In the 'Backup to' pane, click 'Browse', select a location for the backup, 4. Click 'OK'.
1. Start the accounting program that you use, click 'Open an Existing
Company', click the company that you want to open, and then click 'Open'.
2. Click 'OK' when you receive the following message:
to a database created with a previous version of Small Business
Accounting and must be upgraded before it can be opened. The system
will take a backup of the database before proceeding with the upgrade.
Please click OK to proceed with the upgrade or click Cancel to select
another company.
and then type 'the name of the backup'.
How to obtain the latest Windows XP service pack
SUMMARY
Windows XP updates are distributed in service packs. Service packs help keep Windows XP current, and extend and update the functionality of your computer.
INFORMATION
To install Windows XP Service Pack 3 (SP3), either Windows XP Service Pack 1a (SP1a) or Windows XP Service Pack 2 (SP2) must already be installed.
If you have to install Windows XP Service Pack 1a or Windows XP Service Pack 2, go to the 'Windows XP Service Pack 1a' section or the 'Windows XP Service Pack 2' section in this article.
Important These service packs apply only to 32-bit versions of Windows XP. For more information about service packs for Windows XP Professional x64 Edition.
To determine which service pack is currently installed on your computer, follow these steps:
- Click Start, and then click Run.
- Copy and paste, or type the following command and then click OK:
winver
A dialog box displays the version of Windows and the service pack that is currently installed on your computer.
Note: You can right-click My Computer icon and then select properties. System properties is quick check method to determine service pack installed on the computer.
How to obtain Windows Service Pack 3
There are three ways to obtain the latest service pack:
- You can turn on Automatic Updates so that your computer downloads the latest service pack automatically.
- You can download the service pack manually online.
- You can order the service pack on a CD.
Turn on Automatic Update
The best way to obtain Windows XP SP3 is to turn on the Automatic Updates feature in Windows XP. To turn on the Automatic Updates feature, follow these steps:
- Click Start, and then click Run.
- Copy and paste, or type the following command, and then press ENTER: sysdm.cpl
- Click the Automatic Updates tab, and then click to select one of the three options. We recommend that you select the Automatic (recommended) option, and then choose the time that you want under Automatically download recommended updates for my computer and install them.
- Click Ok.
After you turn on Automatic Updates, your computer can start to download updates automatically.
Download the service pack manually
You can use Windows Update or the Microsoft Download Center to obtain Windows XP SP3 online.
Check for updates on Windows Update
To check for updates on Windows Update, follow these steps:
- Visit the following Microsoft Web site : http://windowsupdate.microsoft.com
- Click Express (Recommended).
- If your computer is up to date, Windows XP SP3 will be one of the updates that is automatically selected. Click Install. If your computer is not up to date, Windows Update will offer some other updates that you have to install first. Install those, and then repeat steps 1 and 2 to obtain Windows XP SP3.
- For Windows XP SP3, review and accept the Microsoft Software License Terms.
Windows XP SP3 will be downloaded to your computer, and the Windows XP Service Pack 3 Setup Wizard will help you install it.
Download the latest Windows XP service pack from the Microsoft Download Center
If you have problems obtaining the service pack from Windows Update, you can download the stand-alone update package from the Download Center. This page will say that this installation package is intended for IT professionals and developers. However, you can safely download this file. The following file is available for download from the Microsoft Download Center:
Download the Windows XP Service Pack 3 package.
Order Windows XP Service Pack 3 on a CD
To order Windows XP SP3 on a CD, visit one of the following Microsoft Web sites, as appropriate for your region:
Asia
Europe and Africa
North America
South America
Information about previous service packs
Windows XP Service Pack 2
Release Date: August 25, 2004To obtain Windows XP SP2, visit the following Microsoft Web site:
http://www.microsoft.com/downloads/details.aspx?FamilyId=049C9DBE-3B8E-4F30-8245-9E368D3CDB5A&displaylang=en
Windows XP Service Pack 1a
Release Date: February 3, 2003To obtain Windows XP SP1a, visit the following Microsoft Web site:
How to:Uninstall Internet Explorer 7
Solution: Use one the following methods: 1. Use 'Add or Remove Programs' to uninstall Internet Explorer 7. 2. Use Spuninst.exe to uninstall Internet Explorer 7
Method 1: Use 'Add or Remove Programs' to uninstall Internet Explorer 7
Step 1: Use 'Add or Remove Programs' to uninstall Internet Explorer 7
a. Click 'Start' and then click 'Run'.
b. In the 'Open' box, type 'appwiz.cpl' and then click 'OK'.
c. In the list of programs, click 'Windows Internet Explorer 7' and then click 'Remove'.
d. Follow the wizard instructions to uninstall Internet Explorer 7.
After you uninstall Internet Explorer 7, double-click the Internet Explorer icon to verify that Internet Explorer 6 is restored.
If you cannot uninstall Internet Explorer 7 by using this method, try Method 2.
Method 2: Use Spuninst.exe to uninstall Internet Explorer 7
Step 1: Make hidden files and hidden folders visible
a. Click 'Start' and then click 'My Documents'.
b. On the 'Tools' menu, click 'Folder Options'.
c. Click the 'View' tab.
d. In the 'Advanced settings' list, under 'Hidden files and folders', click 'Show hidden files and folders'
and then click 'OK'.
Step 2: Run Spuninst.exe to uninstall Internet Explorer 7
a. Click 'Start' and then click 'Run'.
b. In the 'Open' box, type '%windir%\ie7\spuninst\spuninst.exe' and then click 'OK'.
c. Follow the wizard instructions to uninstall Internet Explorer 7.
After you uninstall Internet Explorer 7, double-click the Internet Explorer icon to verify that Internet
Explorer 6 is restored.
How to remove Windows XP Service Pack 3 from your computer
Windows XP Service Pack 3 (SP3) contains important updates for Windows XP. After you install Windows XP SP3, a hardware device or an installed program may work differently. Therefore, you may want to uninstall Windows XP SP3 as a troubleshooting step. This article describes how to remove Windows XP SP3 from your computer.
Method 1: Use the 'Add or Remove Programs' item in Control Panel
- Click Start, and then click Run.
- Copy and then paste the following command in the Open box, and then press ENTER:
appwiz.cpl - Click to select the Show Updates check box.
- Click Windows XP Service Pack 3, and then click Remove.
- Click Finish to restart the computer after the removal process is complete.
Method 2: Use the hidden $NtServicePackUninstall$ folder
- Click Start, click Run, type c:\windows\$NtServicePackUninstall$\spuninst\spuninst.exe in the Open box, and then click OK.
- When the Windows XP Service Pack 3 Removal Wizard starts, click Next.
- Follow the instructions on the screen to remove Windows XP SP3
Method 3: Use the System Restore process
Note Before you use System Restore, make sure that you have restarted the computer at least one time after you installed Windows XP SP3. By restarting the computer, you allow for any remaining servicing processes to finish.
- Click Start, and then click Run.
- Copy and then paste the following command in the Open box, and then press ENTER:
%systemroot%\System32estorestrui.exe - Click Restore my computer to an earlier time, and then click Next.
- Click the date on which you installed Windows XP SP3, and then click Installed Window XP Service Pack 3 in the Restore Point box.
- Click Next, and then follow the instructions on the screen to remove Windows XP SP3.
Method 4: Use Recovery Console
Important This section, method, or task contains steps that tell you how to modify the registry. However, serious problems might occur if you modify the registry incorrectly. Therefore, make sure that you follow these steps carefully. For added protection, back up the registry before you modify it. Then, you can restore the registry if a problem occurs. For more information about how to back up and restore the registry, click the following article number to view the article in the iYogi Knowledge Base: How to back up and restore the registry in Windows
If you cannot remove Windows XP SP3 by using one of the previous methods, follow these steps:
- Insert the Windows XP CD in the CD drive or in the DVD drive, and then restart your computer. When you receive the following message, press a key to start your computer from the Windows XP CD:
Press any key to boot from CD
Note The computer must be configured to start from the CD drive or from the DVD drive.
- When you receive the Welcome to Setup message, press R to start the Recovery Console.
Note Multiple options will appear on the screen.
- Select the correct Windows XP installation.
Note You must select a number before you press ENTER, or the computer will restart. Typically, only the 1: C:\Windows selection is available.
- If you are prompted to type an administrator password, do so. If you do not know the administrator password, press ENTER. (Typically, the password is blank.)
Note You cannot continue if you do not have the administrator password.
- At the command prompt, type cd $ntservicepackuninstall$\spuninst, and then press ENTER.
- At the command prompt, type batch spuninst.txt, and then press ENTER.
Note The Spuninstal.txt file appears. As the file scrolls down, you will see errors and the files that are being copied. This is typical behavior.
- After Windows XP SP3 is removed, type exit, and then press ENTER.
- Restart the computer in safe mode. To do this, press F8 when the computer restarts.
Note After you restart the computer, the computer may stop responding, and you may see a black screen. The mouse will work. In this case, restart the computer again by turning the computer off and then back on. The second restart will let you log on.
- When the computer restarts, Windows Explorer (Explorer.exe) does not run, and the Windows icons and the Start button are unavailable. To resolve this problem, follow these steps:
- Press CTRL+ALT+DEL, and then click Task Manager in the Windows Security screen.
- Click File, and then click New Task (Run).
- In the Open box, type regedit, and then click OK.
- Locate and then click the following registry subkey: HKEY_LOCAL_MACHINE\System\CurrentControlSet\Services\RpcSs
- In the details pane, right-click ObjectName, click Modify, type LocalSystem in the Value data box, and then click OK.
- Restart the computer
- Use one of the previous methods to remove Windows XP SP3 from your computer.
Subscribe to:
Posts (Atom)